Loading your own Historical Data
You have two options:
Actually, there is an option 3: you can type the numbers (or copy/paste) into the SurvivalWare grid directly.
Option 1 - From an Existing Spreadsheet
The important thing is to separate the Profit and Loss statement from the Balance Sheet into two files, and follow a simple convention of labeling rows and columns.
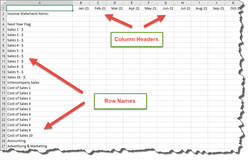
Row 1 should consist of column labels starting in column B. These should be in date format corresponding to the month they represent. (e.g. 6/1/2022 or Jun 2022).
Column A should contain the row names starting in row 2. They must be identical to the row names used in the Fort Knox model. The variables are not case sensitive.
In the Fort Knox data folder (C:\SurvivalWareNet\FortKnox\Data) you will find two template files that you can use to enter data for import:
You have two options:
- You can load data from an existing spreadsheet that you maintain and use for financial analysis.
- You can export data from your accounting system and map the accounts to input rows in the Fort Knox model.
Actually, there is an option 3: you can type the numbers (or copy/paste) into the SurvivalWare grid directly.
Option 1 - From an Existing Spreadsheet
The important thing is to separate the Profit and Loss statement from the Balance Sheet into two files, and follow a simple convention of labeling rows and columns.
Row 1 should consist of column labels starting in column B. These should be in date format corresponding to the month they represent. (e.g. 6/1/2022 or Jun 2022).
Column A should contain the row names starting in row 2. They must be identical to the row names used in the Fort Knox model. The variables are not case sensitive.
In the Fort Knox data folder (C:\SurvivalWareNet\FortKnox\Data) you will find two template files that you can use to enter data for import:
- DD5-BS-Template.XLSX (for the balance sheet)
- DD5-PL-Template.XLSX (for the Profit & Loss statement)
Fill in the templates with your data. Modify the column headers in row 1 of the templates so that SurvivalWare knows what each column represents.
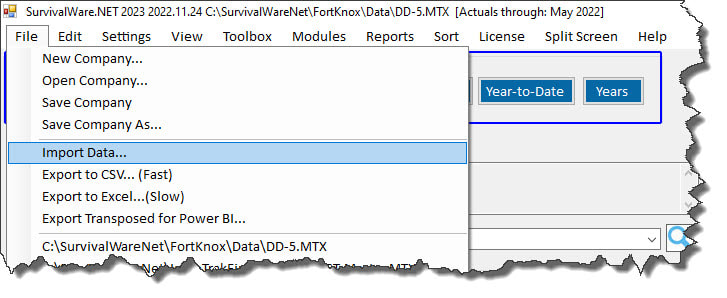
Then: Select File / Import Data.. to import each file separately.
Then: Select File / Import Data.. to import each file separately.
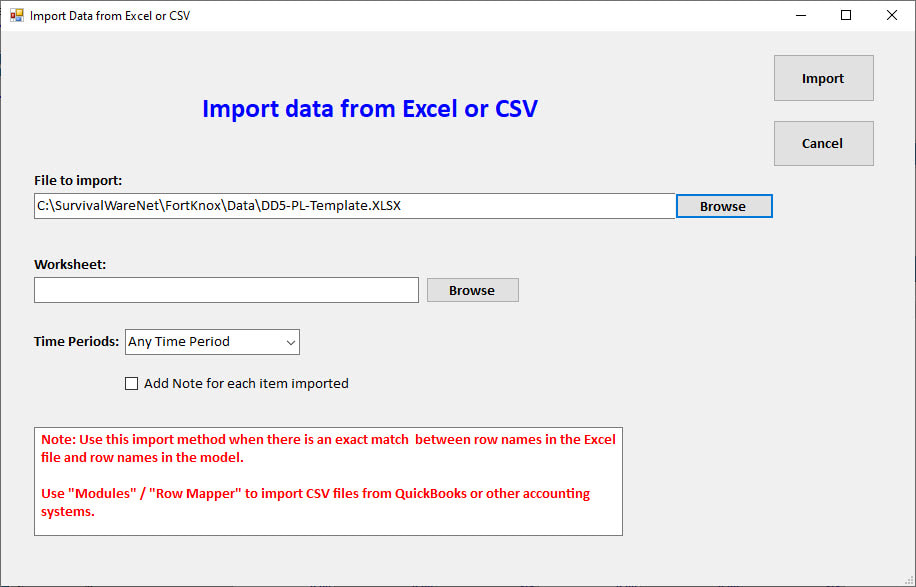
File to import:
Select the Excel file (or CSV file) containing the data.
Worksheet:
If you selected an Excel file, select the worksheet within that file
Time Periods:
Normally, you would use “Any Time Period” to import historical months.
If you want to import a budget, select “Budget” and SurvivalWare will interpret the column headers as Budget Columns.
If you want to import projections only without overwriting any historical columns, select “Projections”
Option 2 - Data exported from your accounting system
The spreadsheets need to be saved as CSV files in order for SurvivalWare to import them.
From QuickBooksThe basic idea is to export a standard Profit and Loss report, and a standard Balance Sheet report. In Quickbooks, you can select a start and end date. We suggest loading as much history as possible – all six years if you have it. Make sure to configure the columns as months so that you get one column per month.
If you use account numbers, these will appear as part of the account names in the report, and this ensures that all account names are unique. If not, be on the lookout for duplicate names. You can change these in the csv file manually after export.
Export them directly as CSV files, not as Excel spreadsheets. Quickbooks does some funny formatting using extra columns for indentation if you export to Excel.
Mapping and Loading
Once you’ve prepared your CSV files for import, follow this three step process:
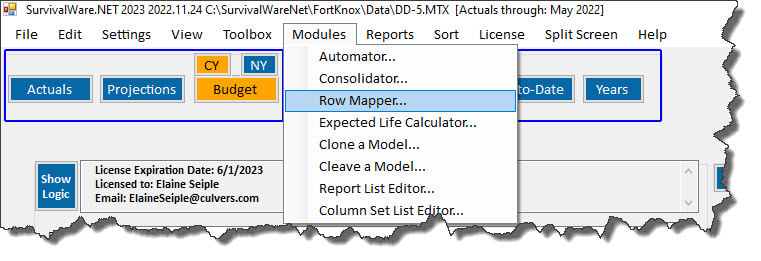
1. Go into the Row Mapper module and select the files for import.
2. Map the rows
3. Import the data and check the results
From the main screen, select Modules / Row Mapper
Select the Excel file (or CSV file) containing the data.
Worksheet:
If you selected an Excel file, select the worksheet within that file
Time Periods:
Normally, you would use “Any Time Period” to import historical months.
If you want to import a budget, select “Budget” and SurvivalWare will interpret the column headers as Budget Columns.
If you want to import projections only without overwriting any historical columns, select “Projections”
Option 2 - Data exported from your accounting system
The spreadsheets need to be saved as CSV files in order for SurvivalWare to import them.
From QuickBooksThe basic idea is to export a standard Profit and Loss report, and a standard Balance Sheet report. In Quickbooks, you can select a start and end date. We suggest loading as much history as possible – all six years if you have it. Make sure to configure the columns as months so that you get one column per month.
If you use account numbers, these will appear as part of the account names in the report, and this ensures that all account names are unique. If not, be on the lookout for duplicate names. You can change these in the csv file manually after export.
Export them directly as CSV files, not as Excel spreadsheets. Quickbooks does some funny formatting using extra columns for indentation if you export to Excel.
Mapping and Loading
Once you’ve prepared your CSV files for import, follow this three step process:
1. Go into the Row Mapper module and select the files for import.
2. Map the rows
3. Import the data and check the results
From the main screen, select Modules / Row Mapper
For complete documentation on how to map your data, go to this Knowledge Base article:
https://survivalware.issuetrak.com/Kb_ArticleView.asp?ArticleNbr=6
Customizing Account Descriptions
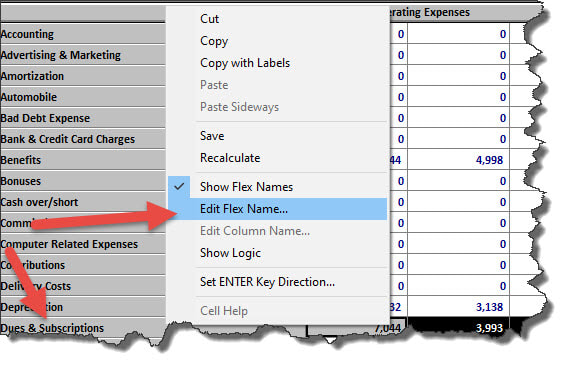
You can rename certain rows with the Flex Names feature
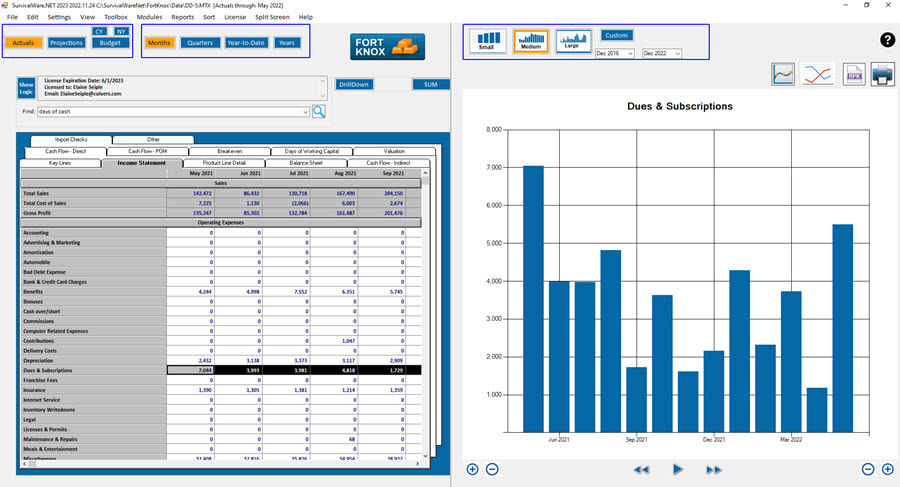
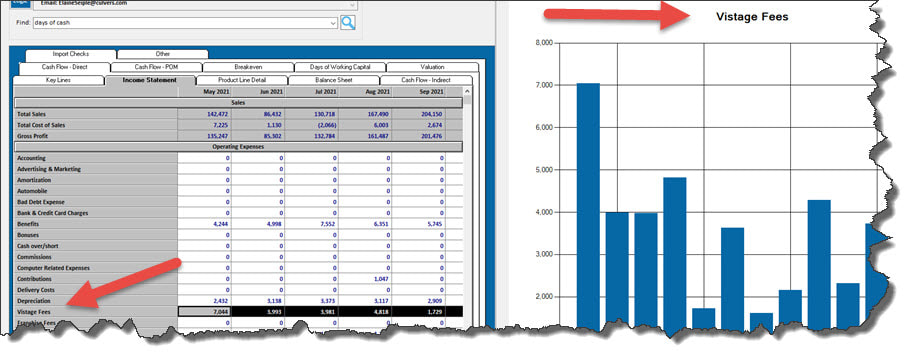
Here’s an example of renaming “Dues & Subscriptions” to “Vistage Fees.”
Before:
https://survivalware.issuetrak.com/Kb_ArticleView.asp?ArticleNbr=6
Customizing Account Descriptions
You can rename certain rows with the Flex Names feature
- Right click on a row name
- Select “Edit Flex Names”
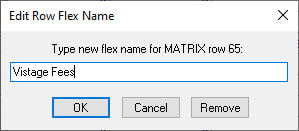
- Enter a new value, and that is what appears in the grid and on the graph
Here’s an example of renaming “Dues & Subscriptions” to “Vistage Fees.”
Before:
Right Click on the row name:
Type in the new name:
After:


 RSS Feed